ANY DONATIONS TO MY SITE ARE GREATLY APPRECIATED!! THANK YOU VERY MUCH!

IF YOU DON’T SPEAK ENGLISH, I HAVE GOOGLE TRANSLATE AVAILABLE ON MY BLOG. SCROLL TO THE VERY BOTTOM OF THIS PAGE TO FIND THE FEATURE, OR YOU CAN GO TO MY HOME PAGE AND SCROLL TO THE BOTTOM TO FIND IT.
Information about “The Crochet Waves of Love Baby Blanket” can be found after the written pattern for my “Crochet Waves of Love Baby Booties.”
Copyright 2018 by Helen Brady. All rights reserved. This pattern may not be used for purposes of mass production. The owner of the pattern may, however, sell the items he or she makes from it.
Would you like a crochet anchor applique on your Crochet Waves of Love Set? You can find the crochet anchor applique at the end of my Crochet Waves of Love Baby Booties video tutorial.
The following are direct links for some of the other crochet items in the Crochet Waves of Love set:
Free Crochet Waves of Love Baby Hat YouTube Video Tutorial:
My Crochet Waves of Love Baby Hat paid written pattern is available for purchase on:
Amazon Kindle Direct link, click here.
The Crochet Waves of Love Baby Booties video tutorial:
The Crochet Written pattern, for my Crochet Waves of Love Baby Booties: It is because of the donors to my blog, that I am going to provide the Crochet Waves of Love Baby Booties free written pattern here on my blog as promised for a limited time:
page 1
ABBREVIATIONS:
Sc= single crochet inc= increase
Ch= chain stitch rnd(s)= round (s)
FO= finish off or fasten off Sl st= slip stitch
Right side= the side that will be showing mm= millimeter (s)
Wrong side= the side that will not be showing. cm= centimeter (s)
dc= double crochet hdc= half double crochet
st= stitch (# total)= stitch count tr= treble crochet
Hdc2tog= Yarn Over (YO). Insert your crochet hook into the next stitch. Pull the yarn through the stitch on your crochet hook. You should now have three loops on your crochet hook. YO Insert your crochet hook into the next stitch. Pull the yarn through the stitch on your crochet hook. You should now have five loops on your crochet hook. YO, pull the yarn through all five loops on your crochet hook.
Treble Crochet (tr)= YO twice. Insert your crochet hook into the next st. Pull the yarn through the st on your crochet hook. You should now have 4 loops on your crochet hook. YO, and pull the yarn through 2 of the loops on your crochet hook. You should now have 3 loops on your crochet hook. YO, and pull the yarn through 2 loops on your crochet hook. You should now have 2 loops remaining on your crochet hook. YO, and pull the yarn through the 2 remaining loops on your crochet hook.
page 2
GENERAL MATERIALS LIST: You can mix and match yarn colors for different looks. Just be aware that different yarn choices can change the look and size of your crochet baby bootie when finished. Also, changing your crochet hook size, will also affect the size of your crochet baby bootie and/or anchor.
-Crochet Hook Size 3.75mm.
-Tapestry Needle
-Scissors.
-Stitch markers (If you don’t have stitch markers, you can use your extra loose yarn ends. I used my excess loose yarn ends on video tutorial
**My yarn recommendations (On You Tube video tutorial, I used some different yarn choices. So, you can see the broad range of yarn choices that you could have when making your own unique crochet baby booties.):
-1 skein Big Twist Rainbow Classic 100% Acrylic Yarn color Serene Blue. You will have plenty of yarn left over.
-1 skein Big Twist Rainbow Classic 100% Acrylic Yarn color Royal Blue. You will have plenty of yarn left over.
ANCHOR GENERAL MATERIALS:
-3.50mm crochet hook
-1 skein Aunt Lydia’s Crochet Thread Classic 10, 100% Mercerized Cotton, Color Peacock. -1 skein Patons Beehive Baby Sport, Light #3 yarn, Color Baby Grey Marl
If you liked the yarn that I used for my crochet anchor, click here, to the affiliated link.
Here is the yarn that I used for the Crochet Anchor Chain, click here, to the affiliated link.
page 3
On YouTube video tutorial, I show how to crochet 2 different sizes: up to 12 months and 3-6 months. I will also show both sizes on this written pattern. I will start with the smaller crochet baby bootie, and show the differences with the larger bootie.
SMALLER SOLE: I started with Royal Blue Colored Yarn.
-Ch14. Starting ch. (***Larger Sole was a ch20 Starting chain)
-Make 3dc into the 4th ch from the hook, then 1dc into the next 2 stitches, 1hdc into the next st., 1dc into the next 3 stitches, 1 tr into the next 3 stitches, (***Larger sole is 1tr in next 6 st), 9tr into the last st. Working in rounds, turn your work to make crochet stitches on the opposite side of your starting chain. Make 1tr into the next 3 stitches (***Larger sole is 1tr in next 6 st), then 1dc into the next 3 stitches, 1hdc into the next st, and 1 dc into the next 2 st, then 3dc into the last st, which is the same st your first 3dc were made. Slst into the top st of the first ch3 that you made. (34 total) (***Larger sole 46 total)
***This is the time that you can measure the sole of your baby shoe, and determine if it is the correct size, before you continue on. Use your free downloadable PDF baby bootie sizing chart to compare it to. When you look at my Larger Sole differences, you will see where I made changes in the size of my initial ch, and in the crochet stitches to alter the size. That way you will see how you can alter the stitches in the sole to get different sole sizes for your baby bootie.
-Using your stitch markers: Place a stitch marker in the following stitches: 5,6,13,14,17,18,29,30, and 33. (***Larger sole stitch markers: 7,9,22,25,26,40,42,47)
-Place your yarn marker before starting your next round (To help keep track of the rounds and stitch count). Make 1sc into the next st and every st around, except for the stitches that contain a stitch marker. Place 2sc into the same st that contains a st marker. Slst into the top st of the first ch3 that you made. Double check your stitch count before going on further. (43 total) (***Larger sole 54 total)
-Move your yarn marker up. Make 1sc into every st around for 3 rounds. (43 total) (***Larger sole is same st count as previous round, unless otherwise specified).
Decrease rounds– Your decrease stitches should be centered around the front of the bootie.
-Make 1sc into 9 stitches, then make 10 hdc2tog stitches. Make 1sc into each of the remaining stitches. (33 total) (***Larger sole: Make 1sc in 17 st, then 12 hdc2tog total st count 42)
-Make 1sc into 9 stitches, then make 6 hdc2tog stitches. Make 1sc into each of the remaining stitches. (27 total) (***Larger sole: Make 1sc in 13st then 8 hdc2tog total st count 34)
-Make 1sc into 9 stitches, then make 3 hdc2tog stitches. Make 1sc into each of the remaining stitches. (24 total) (***Larger sole: Make 1sc into 12 st then 5 hdc2tog total st count 29)
page 5
Join your new color, and cut your previous colored yarn. Bury your loose yarn ends as you crochet. I used Serene Blue.
For the next round, we are going to start our first crochet wave stitch design with our new color. Wave Stitch Rounds:
-Make 2sc into the next st, then make 1sc into the next 3 st, then make 1dc into the next 5 st. *Make 1sc into the next 5 stitches, then make 1dc into the next 5 stitches. Repeat from * for one round. (25 total) (***Large Sole 30 total) **You should have ended this round with 1sc in 5 stitches. (***Large Sole will end the round with 1dc in 5 stitches). The wave st requires a multiple of 5 or 10. The small sole has a multiple of 5, which is “25” and the large sole has a multiple of 10, which is “30.” You have just completed the bottom portion of the wave st.
-*Make 1sc into the next 5 stitches (Each sc st should be in the previous rows sc st), then make 1dc into the next 5 stitches (Each dc st should be in the previous rows dc st). Slst into the next st. (25 total) **You have just completed the top portion of the wave st. You should have completed 2.5 waves in the round. (***Larger sole has 3 total waves in the round.) Join your new color, and cut your previous colored yarn. Bury your loose yarn ends as you crochet. I used Royal Blue. For the next round, we are going to start our second crochet wave stitch design with our new color.
Wave Stitch Rounds: We are going to alternate our wave pattern. Since we started with sc for our last wave pattern, we will start with a dc for our second wave pattern.
-Ch3 (This ch3 should be directly over the previous rows first sc), make 1dc into the next 4 st. *Make 1sc into the next 5 st, and then make 1dc into the next 5 st. Repeat from * Slst into the top st of the first ch3 that you made (25 total) **Each dc will line up with the previous rows sc, and each sc will line up with the previous rows sc. You have just completed the bottom portion of the wave st.
-Ch3, make 1dc into the next 4st. *Make 1sc into the next 5 st, and then make 1dc into the next 5st. Repeat from* Slst into the top st of the first ch3 that you made. (25 total) **Each dc will line up with the previous rows dc, and each sc will line up with the previous rows sc. You have just completed the top portion of the wave st. You should have completed 2.5 waves in the round. (***Large sole 3 waves in the round).
Join your new color, and cut your previous colored yarn. Bury your loose yarn ends as you crochet. I used Serene Blue. -Make 1sc in every st around. FO. (25 total)
page 6
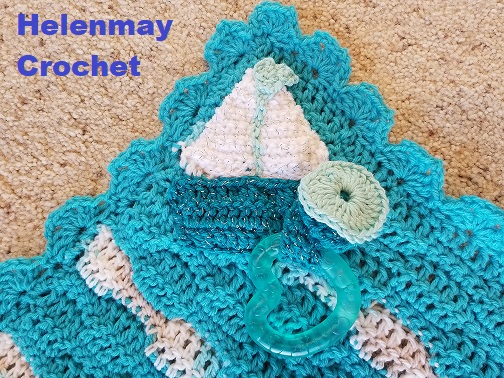
ANCHOR: Peacock colored yarn. The Anchor Chain yarn will also work as the main color for the anchor. Both yarns work with a 3.5mm crochet hook. See the picture at the end of this pattern.
-Ch 16
-Make 1hdc into the 3rd ch from the hook, and make 1hdc in every st back across. FO. Bring enough yarn through to help sew the bottom of the anchor in place later. (15 total) -From the side that you FO, and the right side facing you, count inwards 10 stitches, and join your same colored yarn. Starting with next st over, Sc2tog twice. ***You are in the center of the bottom of the anchor.
-*Ch1, turn your work, make 1sc into the next st. Repeat from * 5 times. (2 total) ***This is the center of the anchor.
-Make a chain of 3, turn your work, then sc into the 2nd ch from the hook, make 1sc into the next st, then that will bring you back to the center of the anchor (small handle, right top part of anchor is complete). Make 1sc into the next 2 st. (Center of the anchor). Make a chain of 3, turn your work, then sc into the 2nd ch from the hook, make 1sc into the next st, then that will bring you back to the center of the anchor (small handle, left top part of anchor is complete). Slst into the next st. (Center of the anchor).
-*Ch1, turn your work, make 1sc into the next st over. Repeat from * 1 more time. (2 total) ***Top center of anchor, above small handles.
-Make a chain of 8, turn your work, Slst into the next st. ***You formed the loop at the top of the anchor.
-Turn your work, and make 8 sc into the center of the loop at the top of the anchor. Slst into the next st. FO. Bring enough yarn through to sew the anchor appliqué in place. ***Thickened the loop at the top of the anchor.
ANCHOR CHAIN: I used Baby Grey Marl colored yarn
-Ch20. FO. Bring enough yarn through to sew the anchor chain on the anchor.
-Tie the smaller loose yarn end around the loop of the anchor. With the right side of the anchor facing you, the knot will be to the right.
-Bring the anchor chain from the back side of the anchor loop, to the front side of the anchor loop.
-Bring the anchor chain across the front of the anchor, to the right, go behind the top right small handle of the anchor.
-Bring the anchor chain from the back side to the front side, by going under the top left small handle of the anchor.
-Bring the anchor chain across the front of the anchor, and down to the bottom of the anchor, bringing the anchor chain towards the back side of the anchor. Sew it in place on the bottom of the anchor.
Page 7
Your anchor appliqué is now ready to be sewn on your Crochet Wave of Love Baby Booties. Line up the anchor on the front of your baby bootie. I started sewing the loop of the anchor first, sewed down the center of the anchor, lined up the bottom of the anchor (make sure it isn’t crooked), sewed the bottom of the anchor in place, and then sewed the anchor chain in place. There is a separate video tutorial for the Crochet Waves of Love Baby Hat, Security Blanket, and Baby Blanket.
Click here for the Free PDF Crochet Baby Shoe Sizing Chart
If you liked the yarn that I used for my crochet anchor, click here, to the affiliated link.
Here is the yarn that I used for the Crochet Anchor Chain, click here, to the affiliated link.
The yarns look good in reverse too, as shown in the pictures below. I used the same size crochet hook for both yarn choices for the anchor.


The Crochet Waves of Love Security Blanket, and matching Baby Blanket, is on YouTube video tutorial only. I DO NOT have the Crochet Written Pattern available as of 24Sept18
Crochet Waves of Love Baby Blanket and matching Security Blanket:
