There are affiliate links below, if you are unsure of what affiliate links are please go to “Disclosures/Disclaimers” and “Privacy Policy” at the top of my HOME page. Affiliate links basically allow me to receive a very small referral fee, but only if you make purchases. Just because you go to the link doesn’t mean that I will receive a referral fee. Thank you so much for considering my affiliate links; I really appreciate it!
I am providing the written pattern for my Crochet Quick and Easy Baby Sweater FREE on my blog!! Just scroll down and you will see the written pattern below. I also have Google Translate available on my blog, just scroll down to the bottom of the page, and you will see the google translate button. If you like this written pattern and YouTube video tutorials, you can purchase a bundled PDF written pattern format for both my Quick and Easy Baby Sweater and My Little Tiny Tulip Baby Sweater, for one low price, on Ravelry!
Direct Ravelry link: Bundled PDF written patterns for my Crochet Quick and Easy Baby Sweater and my Crochet My Little Tiny Tulip Baby Sweater
I was contacted on YouTube by one of my Helenmay Crochet YouTube Channel viewers/subscribers because I was missing the part 3 video tutorial for my Crochet Tiny Tulip Baby Sweater. I couldn’t believe that I didn’t have part 3 up. So, I decided to remake the video tutorials, because the crochet stitch is so quick and easy to make. It is also a fun and beautiful crochet stitch! The crochet stitch looks like little Tiny Tulip buds!!
The direct link to the video tutorial for “My Little Tiny Tulip” crochet Baby Sweater:
Crochet My Little Tiny Tulip step-by-step YouTube video tutorial
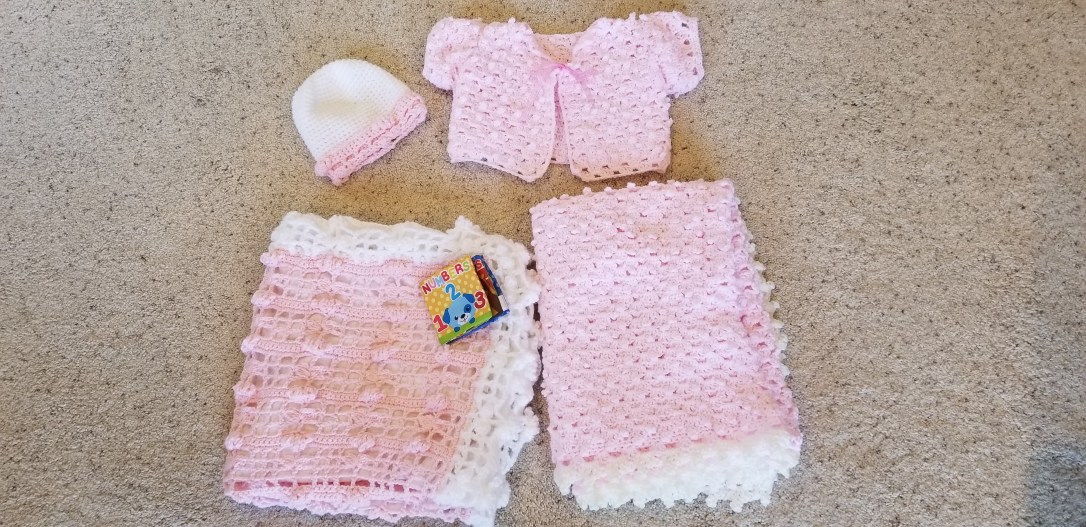
You can make the matching Crochet My Little Tiny Tulip Baby Blanket also!!
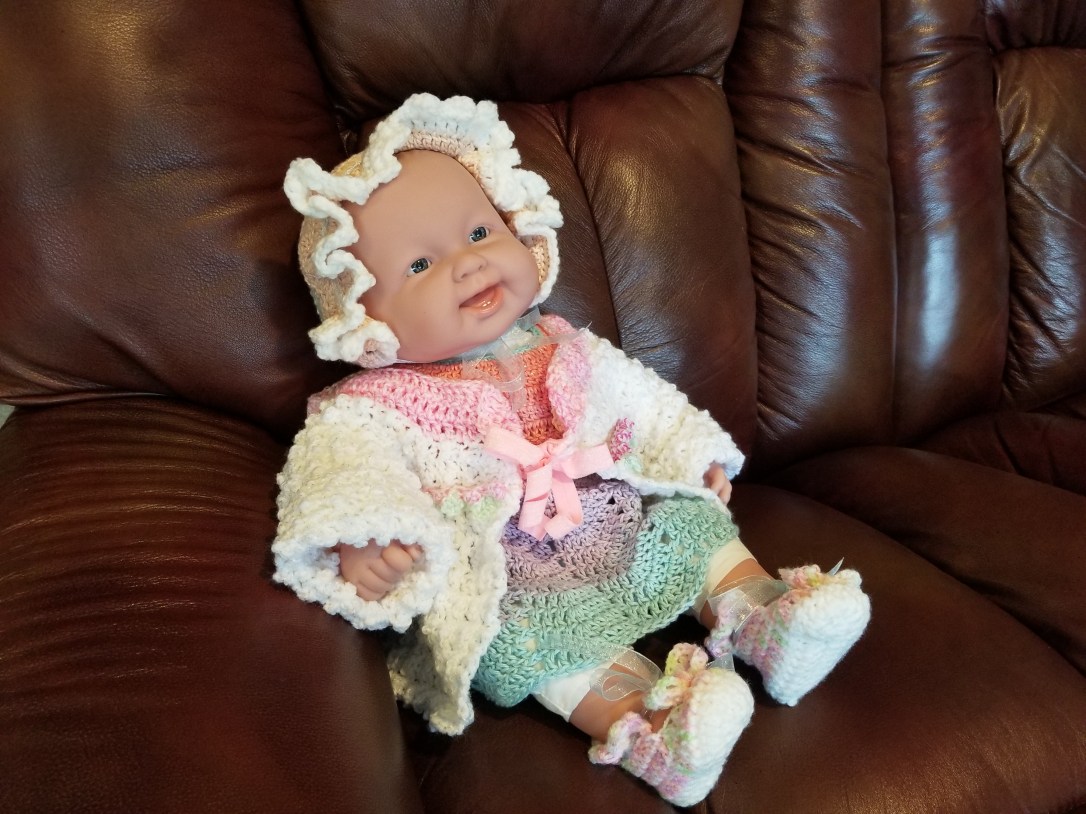
I used different yarn styles in the “My Little Tiny Tulip” crochet baby sweater for the written pattern and the video tutorial:

If you want a lighter sweater then you will love the style of yarn that I used in the video tutorial (Crochet Sweater on the left above). If you want more of a thicker Kimono style baby sweater, you will love the part alpaca style yarn that I used in the video tutorial (Crochet Sweater on the right above).
You may also like my Crochet Quick and Easy Baby Sweater video tutorial:

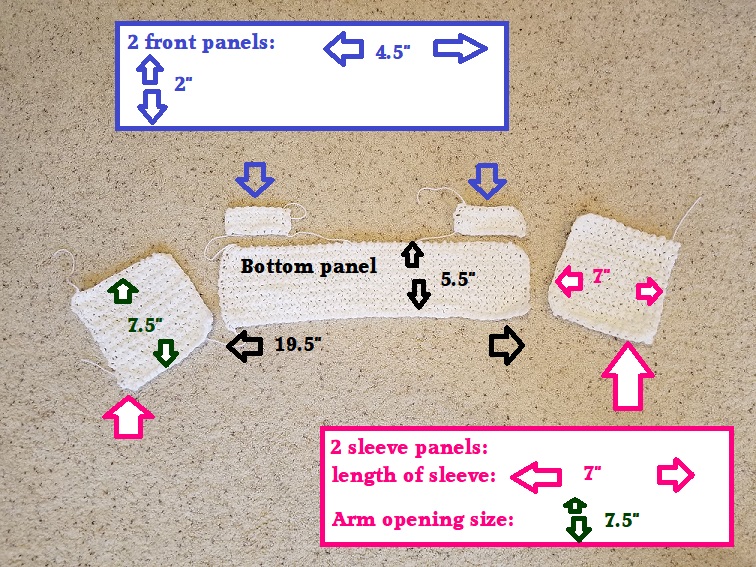
I give all of the measurements for the panels to make it easier to size your crochet sweater by making adjustments to the panel sizes in each of the sweater styles.
If you need a free PDF downloadable graph to help size your crochet sweater, here is the free download:
Here is the direct link to the video tutorial for my Crochet Quick and Easy Baby Sweater to assist you if needed: Crochet Quick and Easy Baby Sweater YouTube video tutorial
The FREE Crochet written pattern on my blog will be for my Quick and Easy Baby Sweater:
Page 1. Intro
The video tutorial does not include the collar portion. Only this written pattern includes the collar.
Page 2.
Copying and distribution prohibited. For personal use only.
ABBREVIATIONS:
sc= single crochet
inc= increase
ch= chain stitch
hdc= half double crochet
FO= finish off or fasten off
Sl st= slip stitch
dc= double crochet
Sc2tog= single crochet 2 stitches together
Right side= The side you want showing.
Wrong side= The side you don’t want showing.
St= Stitch YO= Yarn Over
Tr= Treble= YO twice, insert your crochet hook into the desired st, bring up a loop. You should have 4 loops on your crochet hook. YO and bring the yarn through 2 loops. You should have 3 loops remaining on your crochet hook. YO and bring the yarn through 2 loops. You should have 2 loops remaining on your hook. YO and bring the yarn through the 2 remaining loops.
Page 3. General Materials
GENERAL MATERIALS LIST: You can mix and match yarn colors for different looks. Just be aware that different yarn choices from mine can change how your baby sweater will look. Also, if you change the crochet hook size, it may affect the size and look of your finished crochet baby sweater. There is a step-by-step YouTube video tutorial for this crochet baby sweater. Here is the direct link: https://youtu.be/-cpYBM4-SfQ
-5.00mm crochet hook
-Tapestry/Darning Needle
-Scissors
-2 strips of ribbon of your choice for the front of the sweater. Mine measured approximately 12-14” each. I chose “Merchant 41 Decorative Trim Pink 1/2”. I used a sewing needle and white thread to sew the ribbon to the knot on both sides of the sweater.
Yarn: I used different yarn choices in the video tutorial to show alternate yarn choices.
-1 skein Bernat Baby Sport Yarn white colored.
-1 skein Kai yarn “Happy” colored yarn.
-1 skein Bernat Baby Coordinates “Iced Mint” colored yarn. You will have plenty of this yarn left over for other crochet baby projects. Be very careful when using this yarn because it likes to tangle easily when you get close to finishing off the skein. I don’t recommend pulling from the middle with this yarn, if you can even find the middle end :).
Page 4
Copying and distribution prohibited. For personal use only.
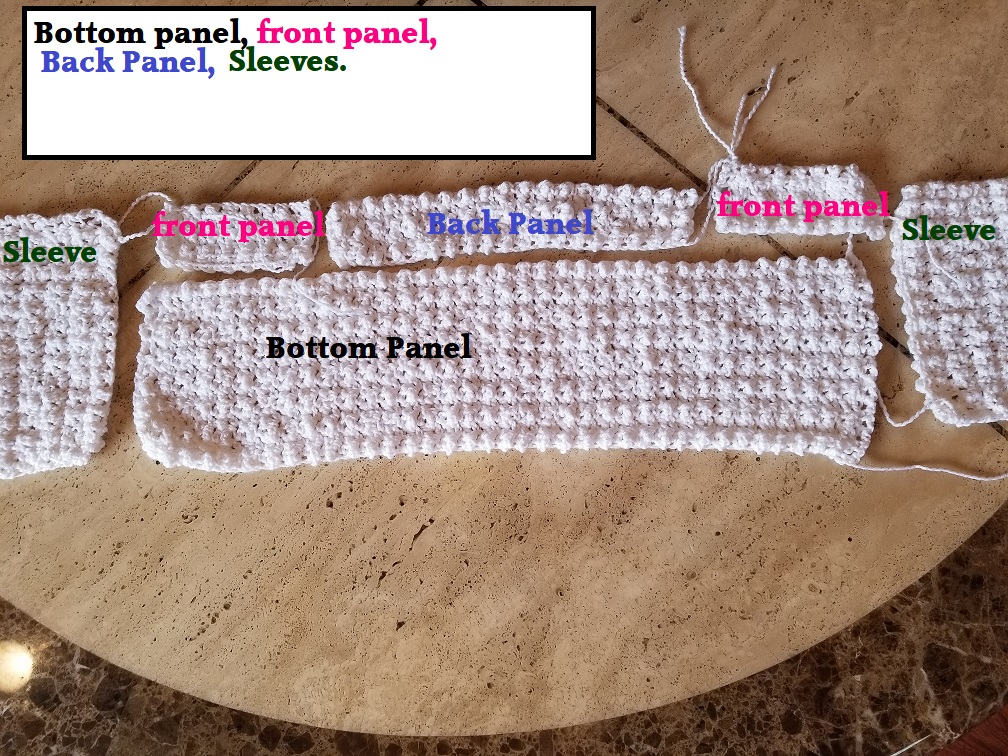
BOTTOM PANEL: Use your white colored yarn. Measurements: Length 19.5” x Height 5.5” . When front panels are folded inward length 8.5”.
Your starting chain should be the length that you want for your baby sweater. In the video tutorial, I show how to measure and follow the baby sweater sizing chart. The starting chain will change depending on the yarn and hook size that you are using to make the sweater.
For the Bernat Sport Baby yarn, this is how I make the sweater for this written pattern:
Starting Chain: ch75
Row 1: Make 1sc into the 2nd ch from the hook, *1tr into the next st. Then 1sc into the next st. Repeat from * back across. You can end the row with either a sc or tr. Measurement should be the length 19.5”
Row 2 helpful hint: You want to make the same st as the previous row. If your next st from the previous row is a sc, then you will make a sc into that st for this row. If your next st is a tr from the previous row, then you will make a tr into that st for this row. To start row 2: If you have a sc in the next st, start with a ch1. If you have a tr in the next st, start with a ch4. I ended row 1 with a sc, and my next st from the previous row is a sc. So, I will start row 2 with a ch4.
Row 2: Ch4, turn your work, *make 1sc into the next st and then 1tr into the next st. Repeat from * back across.
Keep repeating Row 2 until you get the height that you need, which is 5.5”. Hint: It might be helpful to place a st marker on your last st for the row because it might be difficult to see the sc st (If you ended with a sc for the row). I made approximately 14 rows that measured 5.5”.
FRONT PANEL: Use your white colored yarn. Make 2. Measurement: Length 4.5” x Height 2”.
Starting Chain: Ch18
Row 1: Make 1sc into the 2nd ch from the hook, *1tr into the next st. Then 1sc into the next st. Repeat from * back across. You can end the row with either a sc or tr. Measurement should be the length 4.5”
Row 2 helpful hint: You want to make the same st as the previous row. If your next st from the previous row is a sc, then you will make a sc into that st for this row. If your next st is a tr from the previous row, then you will make a tr into that st for this row. To start row 2: If you have a sc in the next st, start with a ch1. If you have a tr in the next st, start with a ch4. I ended row 1 with a sc, and my next st from the previous row is a sc. So, I will start row 2 with a ch4.
Row 2: Ch4, turn your work, *make 1sc into the next st and then 1tr into the next st. Repeat from * back across.
Page 5
Copying and distribution prohibited. For personal use only.
FRONT PANEL Cont: Remember to make 2.
Keep repeating Row 2 until you get the height that you need, which is 2”. Hint: It might be helpful to place a st marker on your last st for the row because it might be difficult to see the sc st (If you ended with a sc for the row). I made approximately 5 rows measuring 2”.
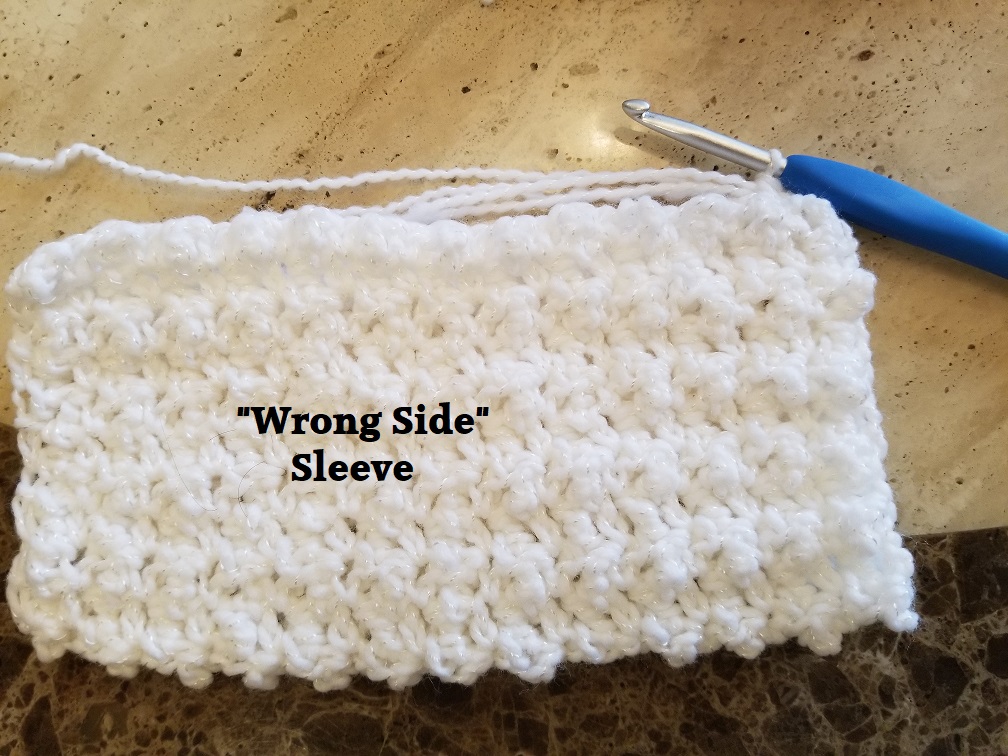
SLEEVE: Use your white colored yarn. Make 2. Measurements Video Tutorial: Length 8” x 6.5” height. Measurements Written Pattern: Length 7” x 7.5” height. If you want to make the arm holes slightly larger, you would increase the height (Number of rows). If you want to decrease the length of the sleeve, you would decrease the length (Starting Chain). Remember that if you adjust the sleeve size, you will need to adjust the shoulder panel size later (Page 10).
Starting Chain: ch 28
Row 1: Make 1sc into the 2nd ch from the hook, *1tr into the next st. Then 1sc into the next st. Repeat from * back across. You can end the row with either a sc or tr. Measurement should be the length 7”
Row 2 helpful hint: You want to make the same st as the previous row. If your next st from the previous row is a sc, then you will make a sc into that st for this row. If your next st is a tr from the previous row, then you will make a tr into that st for this row. To start row 2: If you have a sc in the next st, start with a ch1. If you have a tr in the next st, start with a ch4. I ended row 1 with a sc, and my next st from the previous row is a sc. So, I will start row 2 with a ch4.
Row 2: Ch4, turn your work, *make 1sc into the next st and then 1tr into the next st. Repeat from * back across.
Keep repeating Row 2 until you get the height that you need, which is 7.5”. Hint: It might be helpful to place a st marker on your last st for the row because it might be difficult to see the sc st (If you ended with a sc for the row). I made approximately 22 rows that measured 7.5”.
Page 6
Copying and distribution prohibited. For personal use only.
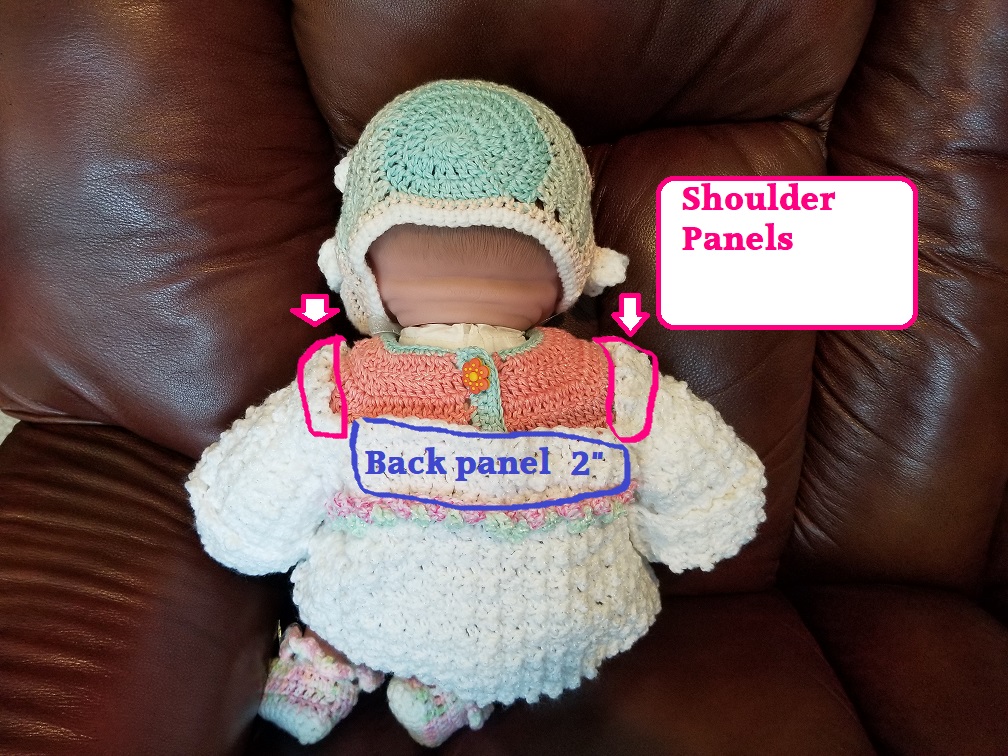
BACK PANEL: Use your white colored yarn. Make 1. Length 10.5” x Height 2” (You may want to adjust the height if you are not making the collar. Look at page 11 to see a 2” height with/without a collar. If you aren’t making a collar, I would recommend making the back panel height approximately 3 to 4 inches instead of 2″). Remember that if you adjust the height, you will need to adjust the shoulder panel when you get to it (The shoulder panel starting chain).
Starting Chain -Ch 40
Row 1: Make 1sc into the 2nd ch from the hook, *1tr into the next st. Then 1sc into the next st. Repeat from * back across. You can end the row with either a sc or tr. Measurement should be the length 7”
Row 2 helpful hint: You want to make the same st as the previous row. If your next st from the previous row is a sc, then you will make a sc into that st for this row. If your next st is a tr from the previous row, then you will make a tr into that st for this row. To start row 2: If you have a sc in the next st, start with a ch1. If you have a tr in the next st, start with a ch4. I ended row 1 with a sc, and my next st from the previous row is a sc. So, I will start row 2 with a ch4.
Row 2: Ch4, turn your work, *make 1sc into the next st and then 1tr into the next st. Repeat from * back across.
Keep repeating Row 2 until you get the height that you need, which is 2”. Hint: It might be helpful to place a st marker on your last st for the row because it might be difficult to see the sc st (If you ended with a sc for the row). I made approximately 6 to 7 rows that measured 2”.
Page 7
SEWING THE SLEEVE PANELS: Now you should have all of your sweater panels completed. Time 18:25 in the Video Tutorial. Get your 2 sleeve panels.
Take one of your sleeve panels and fold it in half along the height of the panel with the “right sides” together (The portion of the panel that measures 7.5”. This will be the size for the arm opening portion of the sleeve). Using your tapestry needle, and same colored yarn, sew along the length of the sleeve (Optional, you can use your crochet hook, and make 1sc in every st along the length of the sleeve).
Set all of your sweater panels aside for now, except for the bottom panel. We are going to make the flower buds now.
FLOWER BUDS: I used “Happy” pink colored yarn and “Iced Mint” colored yarn. Time 20:48 in the video tutorial.
Lay your “Bottom Panel” “right side” up in front of you. In the top right corner, join your “Iced Mint” light green colored yarn.
-Ch 1, make 1sc into the next 2st and then ch8. *Make 1sc into the next 3st and then ch8. Repeat from * across the top of the bottom panel. FO.
Now, turn your bottom panel over so that the “wrong side” is facing up. Time 25:50 in the video tutorial.
Join your “Happy” Pink colored yarn in the top right hand corner.
-Ch1, make 1sc into the next st over, just before the looped “green” colored yarn. *Make sure that the loop of green yarn is on the “right side” of the bottom panel and then skip over the loop of green yarn to make 1sc into the next st., Then make 5sc into the next st. Take your crochet hook out of the loop of yarn created by your 5th sc in the st. Enter the 1st sc that you made in the st from the back loop of the 1st st towards the front loop of the st, grab the loop of yarn created by the 5th st and bring the yarn through the 1st st. To complete your little rose bud. If you did it correctly, your little rose bud will be on the right side of the bottom panel along with the green loop of yarn. Make 1sc into the next st just before the next green loop. Repeat from * all across the top of the bottom panel. FO.
Page 8
Bury your loose yarn ends on your bottom panel and both front panels. We are going to sew on the front panels next.
SEWING ON THE FRONT PANELS: Time 32:39 in the video tutorial.
The bottom panel should have the “wrong side” facing up. Take one of the front panels and line it up in the top right corner. The longer length of the front panel should be lined up with the light green colored yarn on the bottom panel. Using your tapestry needle with the white colored yarn, sew the bottom of the front panel to the bottom edge of the light green colored yarn on the bottom panel. Sew on the other front panel the exact same way on the opposite side (The top left portion of the bottom panel).
Page 9
SEWING THE SLEEVES IN PLACE: Time 36:40 in the video tutorial.


Turn your sleeves inside out so that the “right side” is facing you. The bottom panel should have the “wrong side” facing up. Fold the top right front panel down on top of the bottom panel. Line up the “seam side” of the sleeve (The portion that you sewed/crocheted together) on top of the bottom edge of the front panel (As shown in the top left picture). Fold up the front panel on top of the sleeve. Use your tapestry needle, and white colored yarn to sew the sleeve to the front panel. Only a small portion of the sleeve will be sewn to the front panel at this time. Repeat the process on the opposite side for the other sleeve. Bury the loose yarn ends.
SEWING ON THE BACK PANEL: Time 39:10 in the video tutorial.


The bottom panel should have the wrong side facing up. Take the back panel and make sure that all of the loose yarn ends are buried. Line up the bottom edge of the back panel ,with the “wrong side” facing up, on top of the bottom edge of the light green colored yarn on the bottom panel. Sew all along the length of the back panel from the edge of the front panel to the edge of the opposite front panel as shown in the picture above. A safety pin might help to hold the opposite side of the back panel in place. The sides of the back panel should be sewn to the sides of the sleeve openings.
Page 10
Copying and distribution prohibited. For personal use only.
SHOULDER PANELS: Use your white colored yarn. Make 2. Measurement Length (amount of rows) is 2” x Height (Starting chain) is 3.5”. IF you made a larger sleeve opening, you will need to adjust the size of your shoulder panels. The Length adjustment would alter the size of the neck opening. The Height adjustment alters the size from front to back (The top of the sleeve.). Also, remember that if you adjusted the size of the back panel, you will also need to adjust the starting chain size for the shoulder panel. The shoulder panel goes from Front panel to back panel. Time 40:52 in the video tutorial.
Starting Chain -Ch15 (Should measure approximately 3.5”)
Row 1: Make 1sc into the 2nd ch from the hook, *1tr into the next st. Then 1sc into the next st. Repeat from * back across. You can end the row with either a sc or tr. Row 2 helpful hint: Hint: You want to make the same st as the previous row. If your next st from the previous row is a sc, then you will make a sc into that st for this row. If your next st is a tr from the previous row, then you will make a tr into that st for this row. To start row 2: If you have a sc in the next st, start with a ch1. If you have a tr in the next st, start with a ch4. I ended row 1 with a sc, and my next st from the previous row is a sc. So, I will start row 2 with a ch4.
Row 2: Ch4, turn your work, *make 1sc into the next st and then 1tr into the next st. Repeat from * back across.
Keep repeating Row 2 until you get the length that you need, which is 2”. Hint: It might be helpful to place a st marker on your last st for the row because it might be difficult to see the sc st (If you ended with a sc for the row). I made approximately 5 to 6 rows that measured 2”.
SEWING ON THE SHOULDER PANELS:


Fold the bottom panels inwards so that the “right side” is facing you. Line up the shorter side of the shoulder panel with the top edge of the bottom panel with the “right sides” together. Use the picture above as a guide. After you are finished sewing the shoulder panel to the bottom panel, fold the shoulder panel upwards and lay it on the sleeve with the “right sides” together. Sew all along the length of the shoulder panel to the sleeve (You may want to pin the opposite end of the shoulder panel to the back panel to make sure that it reaches). Finish by sewing the opposite short end of the shoulder panel to the back panel. Remember that the “right sides” should be together. Repeat the whole process with the other shoulder panel. As you sew, make sure to stretch the arm hole opening to make sure that it stays the size that you want.
Page 11


Pictures above: Without the collar on the left. With the collar on the right.
You can always add another inch to the back panel if you wanted to. You will also need to shorten your starting chain for the shoulder pad by an inch, if you do add more height to your back panel. Leave the back panel alone, if you are making the optional collar.
Page 12
ATTACHING THE RIBBON:


With the front “right side” of the sweater facing up, attach the ribbon on both sides of the top of the sweater. I tied a knot and then sewed, with a sewing needle and white thread, the end of the ribbon knot to the knot itself. Use the pictures above as a guide.
Optional Collar look:
Optional Baby Sweater Collar: Not in video tutorial.
Join your pink colored yarn in the same st as the ribbon.
Row 1- Ch3. Make 1dc in every st around the neck to the opposite side’s ribbon. (Approximately 77 total)
Row 2 and Row 3- -Ch3, turn your work, make 1dc into the same st and 1dc into the next st and every st back around the neck, except for the last st. Make 2dc into the last st. FO.
Fold down the triangular tips on each end of the collar and sew them in place with your tapestry needle and same colored yarn.
Page 13
If you like my crochet quick and easy baby sweater, you may like my Crochet My Little Tiny Tulip Baby Sweater.
Page 14


Copyright 2017 by Helen Brady. All Rights Reserved. This pattern may not be used for purposes of mass production.
Helenmay Crochet YouTube Channel Direct link: www.tinyurl.com/helenmaycrochet
Helenmay Crochet Blog: www.Helenmaycrochet.com
Helenmay Crochet YouTube Channel Facebook Group:
https://www.facebook.com/groups/1603416073308144/
