There are affiliated links below. If you are unsure of what affiliated links are, please read my “Disclosures/Disclaimers” and “Privacy Policy,” which can be found at the top of my Home page.
I like to include a recipe with my kitchen crochet patterns on video tutorial. So, if you find another crochet hot pad that you like from my collection of video tutorial patterns on Helenmay Crochet You Tube Channel, you might also find a little treasure in the form of a recipe. I have included a recipe after the written pattern here too.
Here is the direct link to my You Tube Channel: Helenmay Crochet You Tube Channel
Copying and distribution prohibited. For personal use only.
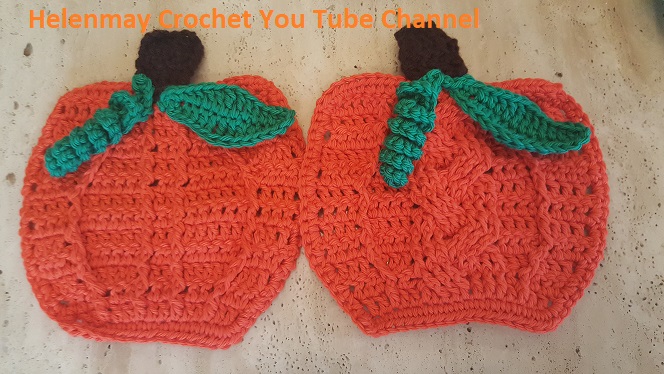
Crochet Pumpkin Hot Pad and Kitchen Towel Topper
Pattern by Helen Brady
The Crochet PDF written pattern can be found on Ravelry! Here is the direct Ravelry link if you would like to purchase the written pattern: Crochet Pumpkin Hot Pat/Potholder with or without the braided cable
However, enjoy the free crochet written pattern on my blog! If you scroll towards the bottom of this blog post, you will find Google Translate!
Want instant updates? It is free to subscribe! To subscribe to my blog, scroll down towards the bottom of this post until you see the “Subscribe to blog via email” link.
If you would like to see a list of all of my Crochet PDF written patterns that can be found on Ravelry go to the top of my blog’s HOME page for the direct link!
The first written pattern is for the Crochet Pumpkin Hot Pad without the braided cable, and the second written pattern is for the Crochet Pumpkin Hot Pad with the braided cable.
ABBREVIATIONS
SC= single crochet inc=increase
Ch= chain stitch rnd(s)=round (s)
FO= finish off or fasten off Sl st= slip stitch
mm= millimeter (s) hdc= half double crochet dc=double crochet
FP dc=front post double crochet BP dc=back post double crochet
tr= treble crochet Dc2tog= double crochet 2 stitches together
GENERAL MATERIALS LIST:
-1 skein “I Love This Cotton” yarn color Glowing and/or Papaya
-1 skein “I Love This Cotton” yarn color Bright Green
-1 skein “I Love This Cotton” yarn color Brown
– 4.00mm crochet hook
-1 tapestry needle
-1 pair of scissors
STITCH GUIDE: This pattern is for all levels of crocheters, but for beginners, look at all of the crochet stitches you will be using for this crochet pattern. The video tutorial is also available after the written pattern.
hdc: Yarn over (yo) and insert your hook into the next stitch over, bring up a loop. You now have 3 loops on your hook. Yo and draw the yarn through all three loops on the hook. You have completed a hdc.
dc: Yo and insert your hook into the next stitch over, bring up a loop. You now have 3 loops on your hook. Yo and draw the yarn through 2 loops on the hook, twice. You have completed a dc.
FP dc: Yarn over (yo) and insert your hook so that the next stitch dc post is in front of your crochet hook (Front of crochet work to Back of crochet work, across the back of the dc post, and then from Back of crochet work to Front of Crochet work). The dc post should be in front of the crochet hook. Bring up a loop, you should have 3 loops on the hook, yo and draw the yarn through 2 loops on the hook, twice. You have completed a FP dc.
BP dc: Yarn over (yo) and insert your hook so that the next stitch dc post is in back of your crochet hook (Back of crochet work to Front of crochet work, across the front of the dc post, and then Front of crochet work to back of crochet work). The dc post should be in back of the crochet hook. Bring up a loop, you should have 3 loops on the hook, yo and draw the yarn through 2 loops on the hook, twice. You have completed a BP dc.
dc2tog: Yo and insert your hook into the next stitch over, bring up a loop. You now have 3 loops on your hook. Yo and draw the yarn through 2 loops on the hook. You have 2 loops remaining on your crochet hook. Yo and insert your hook into the next stitch over, bring up a loop. You now have 4 loops on your hook. Yo and draw the yarn through 2 loops on the hook, yo and draw the yarn through all 3 loops on the hook. You have completed a dc2tog.
Treble Crochet: Yo twice and insert your hook into the next stitch over, bring up a loop. You now have 4 loops on your hook. Yo and draw the yarn through 2 loops on the hook, three times. You have completed a tc.
BP tr: Yo twice and insert your hook so that the next stitch dc post is in back of your crochet hook (Back of crochet work to Front of crochet work, across the front of the dc post, and then Front of crochet work to back of crochet work). The dc post should be in back of the crochet hook. Bring up a loop, you should have 4 loops on the hook, yo and draw the yarn through 2 loops on the hook, three times. You have completed a BP tr.
FP tr: Yo twice and insert your hook so that the next stitch dc post is in front of your crochet hook (Front of crochet work to Back of crochet work, across the Back of the dc post, and then Back of crochet work to Front of crochet work). The dc post should be in front of the crochet hook. Bring up a loop, you should have 4 loops on the hook, yo and draw the yarn through 2 loops on the hook, three times. You have completed a FP tr.
CROCHET PUMPKIN HOT PAD WITHOUT BRAIDED CABLE FREE WRITTEN PATTERN
-ch18
Row 1- Make 1dc into the 4th ch from the hook, and 1dc in every stitch back across (16 total).
Row 2- Ch 3, turn your work, make 1dc into the same stitch, 1dc into the next 2 stitches.* 1 BP dc around next stitch, 1dc into the next 2 stitches, Repeat from * for a total of 4 times. 1 dc into the next 2 stitches, and 2dc into the last stitch (18 total).
Row 3- ch3, turn your work, make 1dc into the same stitch, make 1dc into the next 2 stitches, skip next stitch, make 1 FP dc around previous rows BP dc, turn your work and make 1dc into the skipped stitch. Turn your work and make 1 dc into the same FP dc stitch from the previous row. 2dc into next stitch, 1dc into next stitch, FP dc, 1dc in 2 stitches, FP dc, 1dc into next stitch, 2dc into next stitch, 1dc into the next 2 stitches, FP dc around the previous rows BP dc. 3 stitches remaining. Make 1dc into the next 2 stitches, and 2dc in the remaining stitch (24 total).
Row 4- Ch3, turn your work, 1dc into the same stitch. 1 dc into the next 2 stitches, skip a stitch, 1 BP dc, 1dc in skipped stitch, 1dc in BP dc stitch, 1dc in next 5 stitches, 1 BP dc, 1 dc into the next 2 stitches, 1 BP dc, 1dc into the next 7 stitches, turn your work, FP dc around previous rows FP dc stitch, turn your work, make 1dc into the next 2 stitches, and 2dc in the remaining stitch (28 total).
Row 5- Ch3, turn your work, 1dc into the next 3 stitches, 1FP dc around the next stitch, 1dc into the next 7 stitches (Don’t miss the first stitch. Your posts should be lined up), 1FP dc around the next stitch, 1dc into the next 2 stitches, 1FP dc around the next stitch, 1dc into the next 7 stitches, 1 FP dc around the next stitch, 1dc into the next 4 stitches (28 total).
Row 6- Ch3, turn your work, 1dc into the next 3 stitches, 1BP dc around the next stitch, 1dc into the next 7 stitches, 1BP dc around the next stitch, 1dc into the next 2 stitches, 1BP dc around the next stitch, 1dc into the next 7 stitches, 1 BP dc around the next stitch, 1dc into the next 4 stitches (28 total).
Row 7- Ch3, turn your work, 1dc into the next 3 stitches, 1FP dc around the next stitch, 1dc into the next 7, 1FP dc around the next stitch, 1dc into the next 2 stitches, 1FP dc around the next stitch, 1dc into the next 7 stitches, 1 FP dc around the next stitch, 1dc into the next 4 stitches (28 total).
Row 8- Ch3, turn your work, dc2tog, 1dc into the next 3 stitches, turn your work, FP dc around the previous rows FP dc stitch, turn your work, 1dc into the next 6 stitches, BP dc around the next stitch, 1dc into the next 2 stitches, BP dc around the next stitch, 1dc into the next 6 stitches, turn your work, skip the next stitch and make a FP dc around the previous rows FP dc stitch, turn your work, make 1dc into the skipped stitch, 1dc into the FP dc stitch, and 1dc into the next stitch, dc2tog, 1dc into the remaining stitch (28 total).
Row 9- Ch3, turn your work, dc2tog, 1dc into the next 4 stitches, FP dc around the previous rows FP dc stitch, 1dc into the next 5 stitches, FP dc around the next stitch, 1dc into the next 2 stitches, FP dc around the next stitch, 1 dc into the next 5 stitches, skip a stitch, FP dc around the previous rows FP dc stitch, turn your work, make 1dc into the skipped stitch, turn your work, 1dc into the previous rows FP dc stitch, 1dc into the next 2 stitches, dc2tog, 1dc in the remaining stitch (28 total).
Row10- Ch3, turn your work, dc2tog, 1dc, dc2tog, make 1dc into 2 stitches, turn your work, FP dc around previous rows FP dc, turn your work, 1dc into the next stitch, dc2tog, 1dc into the next stitch, BP dc around the next stitch, 1dc into 2 stitches, BP dc around the next stitch, 1dc into the next stitch, dc2tog, 1dc into the next stitch, turn your work, skip a stitch, FP dc around previous rows FP dc, turn your work, make 1dc into skipped stitch, 1dc into previous rows FP dc stitch, dc2tog, 1dc into the next stitch, dc2tog, 1dc into the next stitch (24 total).
Row 11- Ch3, turn your work, dc2tog, 1dc into the next stitch, dc2tog, FP dc around the next stitch, 1dc into the next 3 stitches, FP dc around the next stitch, 1dc into the next 2 stitches, FP dc around the next stitch, 1dc into the next 3 stitches, FP dc around the next stitch, dc2tog, 1 dc into the next stitch, dc2tog, 1dc into the last stitch (20 total).
Row 12- Ch3, turn your work, 1dc into the next 3 stitches, BP dc around the next stitch, 1dc into the next 3 stitches, BP dc around the next stitch, 1dc into the next 2 stitches, BP dc around the next stitch, 1dc around the next 3 stitches, BP dc around the next stitch, 1dc into the remaining 4 stitches.
Now, turn your crochet work to begin crocheting the edging. We are going to crochet down the side of the crochet pumpkin first. Al1 along the side of the crochet work, there are the beginning chain 3’s on each row, that are now on their side. We are going to be crocheting into the space below the chain 3’s. Crochet 2sc into each space below the chain 3’s along the side of the pumpkin.
After finishing the last 2sc into the last ch3 space along the side of the crochet pumpkin, make 2hdc into the first dc stitch along the bottom of the crochet pumpkin. Make 1hdc into every stitch along the bottom of the crochet pumpkin, except for the last stitch. Crochet 2hdc into the last stitch. Continue crocheting 2sc into every ch3 space on the opposite side of the crochet pumpkin. Continue crocheting 2hdc into the first stitch along the top of the crochet pumpkin, and 1hdc in each stitch across the top, except the last stitch. Make 2hdc in the last stitch. Sl st. FO.
Pumpkin Stem: Brown colored yarn
-ch7 Row 1-1dc into the 4th chain from the hook, and then 1dc into each stitch back across (5 total). Row 2 and 3-*ch3, turn your work, 1dc in each stitch, repeat from * 1 more time (5 total).
Make sure the right side of the pumpkin is facing you. Place, and center, the stem at the top of the pumpkin (Overlap the dc row on the stem, on top of the hdc row, at the top of the pumpkin). Sew the stem in place.
Pumpkin Kitchen towel strap: Brown colored yarn
-ch7
Row 1-1dc into the 4th chain from the hook, and then 1dc into each stitch back across (5 total).
Rows 2 through 6-*ch3, turn your work, 1dc in each stitch, repeat from * (5 total).
-Button loop: ch5, slst into the top stitch on the opposite side. FO.
Pumpkin Leaf: Bright green colored yarn
-ch14 One side of leaf
-1sc into the 2nd ch from the hook, and 1sc into the next stitch, 1hdc into the next 2 stitches, 1dc into the next 2 stitches, 1 treble crochet into the next 2 stitches, 1dc into the next 2 stitches, 1 hdc into the next 2 stitches, 4sc into the last stitch.
Opposite side of leaf- Turn your work, so that you are crocheting into the stitches on the opposite side of the leaf. 1hdc into the next 2 stitches, 1dc into the next 2 stitches, 1 treble crochet into the next 2 stitches, 1dc into the next 2 stitches, 1 hdc into the next 2 stitches, 1sc into the 2 remaining stitches. Sl st. ch1. FO.
With the right side of the pumpkin facing you, sew the crochet leaf on to the bottom right corner of the stem. I only sewed the base of the leaf to the stem.
Pumpkin cork screw vine: Bright green colored yarn
-ch23
-3sc into the 2nd ch from the hook, and 3sc into every stitch back across. -FO.
With the right side of the pumpkin facing you, sew the cork screw vine on to the bottom left corner of the stem. I only sewed the base of the cork screw vine to the stem.
Crochet Pumpkin Hot Pad, and Kitchen Towel Topper, with a Braided Cable
-ch21
Row 1- Make 1dc into the 4th ch from the hook, and 1dc in every stitch back across (19 total).
Row 2- Ch 3, turn your work, make 1dc into the same stitch, 1dc into the next 2 stitches.* 1 BP dc around next stitch, 1dc into the next stitch. Start of cable: Skip 3 stitches and make 1 BP tr around the 4th stitch, 1 BP tr around the next 2 stitches, 1 BP tr around each of the 3 skipped stitches (starting with the first furthest skipped stitch), and go in front of the 3 BP tr crochet stitches just completed, 1 BP dc around the next 3 unworked stitches, end of the cable stitches. 5 remaining stitches: 1dc into the next stitch, 1 BP dc, 1dc into the next 2 stitches, 2dc into the last stitch (21 total).
Row 3- ch3, turn your work, make 1dc into the same stitch, make 1dc into the next 2 stitches, skip next stitch, make 1 FP dc around previous rows BP dc, turn your work and make 1dc into the skipped stitch. Turn your work and make 1 dc into the same FP dc stitch from the previous row, 1dc into next stitch. Start of cable stitch: 1FP dc around each of the next 9 stitches (work the back stitches first, 4th,5th, and 6th stitch), end of the cable stitches. 6 remaining stitches: 1 dc into the next 3 stitches, make a FP dc around the previous rows BP dc (it will be at an angle), 1dc into the next 2 stitches, 2dc into the last stitch (25 total).
Row 4- Ch3, turn your work, 1dc into the same stitch. 1 dc into the next 2 stitches, skip a stitch, turn your work, 1 FP dc around previous rows FP dc, turn your work, 1dc in skipped stitch, 1dc in FP dc stitch, 1dc in next 3 stitches. Start of cable: 1bp dc around the next 3 stitches, skip 3 stitches, 1 BP tr around the next 3 stitches, turn your work, 1 FP tr around each of the 3 skipped stitches, starting with the furthest skipped stitch, turn your work, cable stitches completed. 8 stitches remaining: 1 dc into 5 stitches, turn your work, FP dc around previous rows FP dc, turn your work, 1dc into the next 2 stitches, 2dc into the last stitch (29 total).
Row 5- Ch3, turn your work, 1dc into the next 3 stitches, 1FP dc around the next stitch, 1dc into the next 5 stitches (Don’t miss the first stitch. Your posts should be lined up). Start of the cable stitch: 1 BP dc around each of the front 3 treble crochet stitches from the previous row, 1BP dc around each of the back 3 treble crochet stitches from the previous row, 1 BP dc around the 3 remaining stitches, end of cable stitches. 10 stitches remaining: 1dc into the next 5 stitches, 1FP dc, 1dc into the remaining 4 stitches (29 total).
Row 6- Ch3, turn your work, 1dc into the next 3 stitches, 1BP dc around the next stitch, 1dc into the next 5 stitches. Start of the cable stitches: Skip 3 stitches, make 1 BP tr around the next 3 stitches, 1BP tr around the skipped 3 stitches, starting with the furthest skipped stitch first, and go in front of the 3 BP tr crochet stitches just completed (Just like you did for the cable stitch on row 2), 1 bp dc around the next 3 unworked stitches, end of cable stitches. 10 stitches remaining: 1dc into the next 5 stitches, 1 BP dc, 1dc in the 4 remaining stitches (29 total).
Row 7- Ch3, turn your work, 1dc into the next 3 stitches, 1FP dc around the next stitch, 1dc into the next 5 stitches. Start of the cable stitches: 1FP dc around each stitch just like row 3, end of cable stitches. 10 stitches remaining: 1dc into the next 5 stitches, 1 FP dc, 1dc in the 4 remaining stitches (29 total).
Row 8- Ch3, turn your work, dc2tog, 1dc into the next 3 stitches, turn your work, FP dc around the previous rows FP dc stitch, turn your work, 1dc into the next 4 stitches. Cable stitches start: 1BP dc around the first 3 stitches, skip 3 stitches, 1BP tr around the next 3 stitches, turn your work, 1FP tr around the skipped 3 stitches (starting with the furthest skipped stitch), turn your work (cable is made the same way as row 4), end of cable stitches. 6 stitches remaining: 1dc into the next 4 stitches, turn your work, skip a stitch, 1FP dc around the previous rows FP dc, turn your work, 1dc into the skipped stitch, 1dc into the previous rows FP dc stitch, 1dc into the next stitch, dc2tog, 1dc into the last stitch (29 total).
Row 9- Ch3, turn your work, dc2tog, 1dc into the next 4 stitches, FP dc around the previous rows FP dc stitch, 1dc into the next 3 stitches. Cable stitches start: 1 FP dc around each of the next 9 stitches (Just like Row 5, except you are making a FP dc), end of cable stitches. 10 stitches remaining: 1dc into the next 3 stitches, skip a stitch, 1FP dc around the previous rows FP dc, turn your work, 1dc into the skipped stitch, turn your work, 1dc into the FP dc stitch of the previous row, 1dc into the next 2 stitches, dc2tog, 1dc into the last stitch (29 total).
Row10- Ch3, turn your work, dc2tog, 1dc, dc2tog, make 1dc into 2 stitches, turn your work, FP dc around previous rows FP dc, turn your work, 1dc into the next 2stitches. Start of cable: Skip 3 stitches and make 1 BP tr around the 4th stitch, 1 BP tr around the next 2 stitches, 1 BP tr around each of the 3 skipped stitches (starting with the first furthest skipped stitch), and go in front of the 3 BP tr crochet stitches just completed, 1 BP dc around the next 3 unworked stitches, end of the cable stitches (Just like Row 2). 10 remaining stitches: 1dc into the next 2 stitches, turn your work, skip a stitch, 1 FP dc around previous rows FP dc, turn your work, 1dc into skipped stitch, 1dc into previous rows FP dc, dc2tog, 1dc into the next stitch, dc2tog, 1dc into the remaining stitch (27 total).
Row 11- Ch3, turn your work, dc2tog, 1dc into the next stitch, dc2tog, FP dc around the next stitch, 1dc into the next 2 stitches. Start of cable stitch: 1FP dc around each of the next 9 stitches (work the back stitches first, 4th,5th, and 6th stitch), end of the cable stitches (Just like Row 3). 9 stitches remaining: 1dc into the next 2 stitches, FP dc around the previous rows FP dc, dc2tog, 1dc into the next stitch, dc2tog, 1dc into the remaining stitch ( 23 total).
Row 12- Ch3, turn your work, 1dc into the next 3 stitches, BP dc around the next stitch, 1dc into the next 2 stitches. Start of cable: 1bp dc around the next 3 stitches, skip 3 stitches, 1 BP tr around the next 3 stitches, turn your work, 1 FP tr around each of the 3 skipped stitches, starting with the furthest skipped stitch, turn your work, cable stitches completed (Just like Row 4). 7 stitches remaining: 1dc into the next 2 stitches, BP dc around the previous rows FP dc, 1dc into the 4 remaining stitches (23 total).
The rest of the crochet pumpkin is made the same way. Go back to the crochet pumpkin edging, stem, leaf, and corkscrew vine.
Copyright 2017 by Helen Brady. All rights reserved. This pattern may not be used for purposes of mass production.
Video tutorials are after the recipe
Healthy Banana Date Muffins
I don’t have many cookbooks in my kitchen anymore, because we can pretty much get any recipe we want off the internet. However, I do have this cookbook in my kitchen!!! The 40th anniversary edition is considered a classic listed as one of the top ten best-selling cookbooks of all time by the New York Times.
One of my favorite Healthy cookbooks to use!!!!! For the 40th anniversary edition too! Click here. Click here, if you would like to get a more recent edition of their cookbook. I have one of the older versions, which is amazing also!!
CROCHET PUMPKIN HOT PAT WITHOUT BRAIDED CABLE PART 1
CROCHET PUMPKIN HOT PAD WITHOUT BRAIDED CABLE SKIPPED ROW 4
CROCHET PUMPKIN HOT PAT WITHOUT BRAIDED CABLE PART 2
CROCHET PUMPKIN HOT PAT WITHOUT BRAIDED CABLE PART 3
CROCHET PROJECT LEAF FOR PUMPKIN OR FLOWER QUICK, EASY, BEGINNER
CROCHET CORKSCREW VINE FOR PUMPKIN, OR OTHER PROJECTS, QUICK, EASY, BEGINNER
CROCHET PUMPKIN QUICK EASY KITCHEN TOWEL TOPPER
CROCHET PUMPKIN HOT PAT WITH BRAIDED CABLE PART 1
CROCHET PUMPKIN HOT PAT WITH BRAIDED CABLE PART 2
CROCHET PUMPKIN HOT PAT WITH BRAIDED CABLE PART 3
OF COURSE I HAD TO HAVE A RECIPE INCLUDING PUMPKIN!!!! YOU ARE GOING TO LOVE THESE PUMPKIN COOKIES!!
