There are affiliate links below. If you are unsure of what affiliated links are, please read my “Disclosures/Disclaimers” and “Privacy Policy,” which can be found at the top of my Homepage.
This slideshow requires JavaScript.
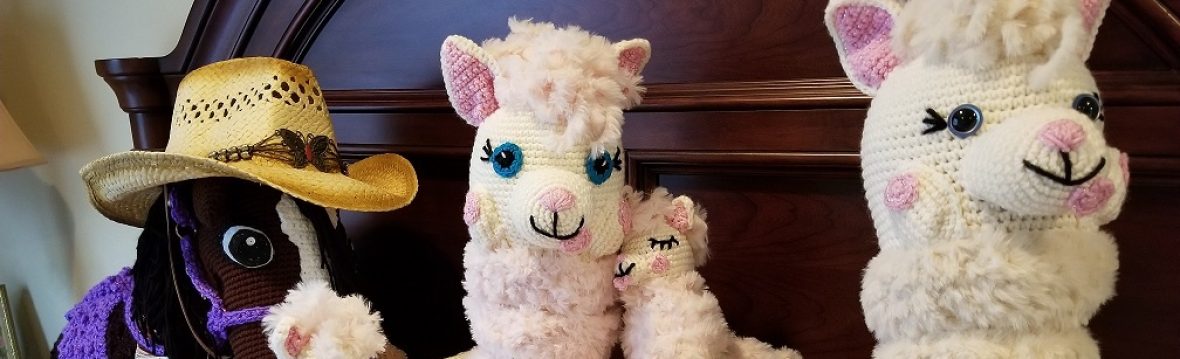
All of the Crochet Heavenly Blessing Set items that you see in the pictures above were included in the set that 1 lucky winner received on 1May18. Congratulations Robyn!!
I decided to go with a different color for my Crochet PDF Written Pattern Heavenly Blessing Set, which includes: Scarf, hat, fingerless or flip mittens, and boot cuffs.
Here are the Direct Ravelry links for the Crochet PDF Written Patterns:
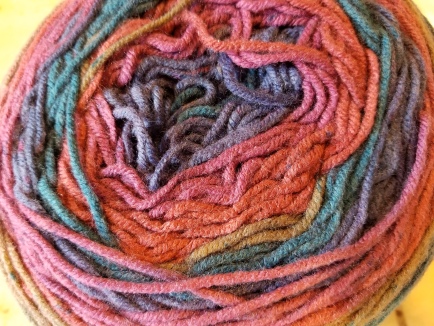
This yarn cake is A LOT larger than the yarn I used on the Video tutorial, but it is the same brand. So, I will be letting you know how many cakes of yarn you will need for each part of the set, and the total amount of cakes of yarn for the whole set. I was able to use one Big Cake for both the Scarf and Flip Mittens!!!!
On Amazon, I tried to pick yarn choices for prices that I would pay for a similar yarn. Watch the prices, because sometimes they change depending on when I posted on my blog. You can change the search for different colors in the same yarn. The prices may vary depending on the yarn color. If you like the yarn that I used for the written pattern, I found it on Amazon, but it is a different color (Peppercream). It is still beautiful, click here to see it. The color above is Plum Pudding, which is the color that I used. My favorite colored scarf was the one that I used in my video tutorial. I was able to find the color (buttercream) on Amazon, but I didn’t like the price. If you still want to check out the buttercream on Amazon, click here. Here is another beautiful color (Red Velvet), with the same brand, click here.
The gorgeous crochet throw in the above-left picture was the free crochet pattern that came with one of my plum pudding colored yarns. You could make the same crochet throw, or you could use my Heavenly Blessing pattern for a similar throw. The above right picture was a free knit pattern that came with one of my plum pudding colored yarns too. For those of you that don’t knit, like me, you could use the knitting patterns for inspiration or different color schemes. I keep the free patterns that I get off of my yarn in a folder.
Heavenly Blessing Scarf Step-by-Step YouTube video tutorial:
Crochet Heavenly Blessing Scarf: Make the tassels by using a device that doesn’t waste any yarn! Perfect Tassels every time! You can also use the Tassel maker to make a separate tassel that matches your scarf! Use the Tassel on a key chain, hang on your purse or bag, etc…
Do you need a yarn bowl?
Check out these great yarn bowls that you may like!
If you liked the designer scissors that I used in the Tassel video tutorial, you may like these similar ones that come with embroidery scissors too! click here.
For a Tassel cap like mine in the video, click here.
If you like the yarn winder and yarn bowl that I used in the pictures above, you can go to my beginner crocheter link to find all of my favorite crochet materials.
This slideshow requires JavaScript.
The alpaca plum colored chunky yarn crochet Heavenly Blessing Child’s Hat that I made, used up all of the yarn to make it. There was nothing left after finishing up with the pom pom. If you like it, I used my 5.75mm crochet hook to make it. You can count the cross st and trinity st rounds in the picture above. I had to alter the size because I only had 1 skein of yarn in that particular color and yarn style. The width is 9 inches (18-19 head circumference, using the hat sizing chart) and the length is 7 to 7.5 inches.
Crochet Heavenly Blessing Matching Hat Step-by-Step YouTube Video Tutorial:
Here is a Free PDF download for sizing your crochet boot cuffs:
1 Caron Big Cake Yarn can make a scarf and set of flip mittens, with a small amount of yarn left over. You will need a 2nd Caron Big Cake Yarn for the hat, boot cuffs, coin purse, and water bottle holder. You will still have yarn left over from the 2nd yarn cake.
Crochet Heavenly Blessing Matching Boot Cuffs Step-by-Step YouTube Video Tutorial:
I like to use my matching yarn to sew the purse frame to my crochet work. However, this can be difficult on the curved portion of the purse frame. An easier alternative would be to use a matching yarn thread instead. Another recommendation would be to center the two large holes on each side, after securing the purse frame in the front middle portion. The large holes tend to rub on the crochet work (as you are sewing the purse frame to the crochet work and may fray your yarn.
Crochet Heavenly Blessing, matching Coin Purse. There is no Crochet Written pattern for the coin purse at this time. Here is the step-by-step YouTube video tutorial showing you how I made it:
The Crochet Heavenly Blessing Matching Water Bottle Holder doesn’t have a written pattern at this time, but here is the step-by-step YouTube video tutorial:
Affiliated links are below. If you are unsure of what affiliate links are, please read my “Disclosures/Disclaimers” and “Privacy Policy.”
This slideshow requires JavaScript.
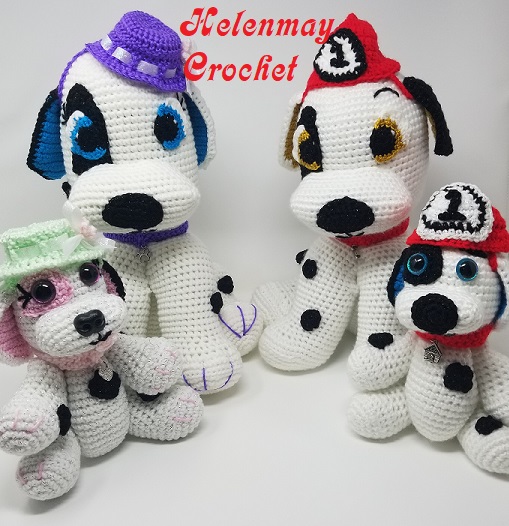
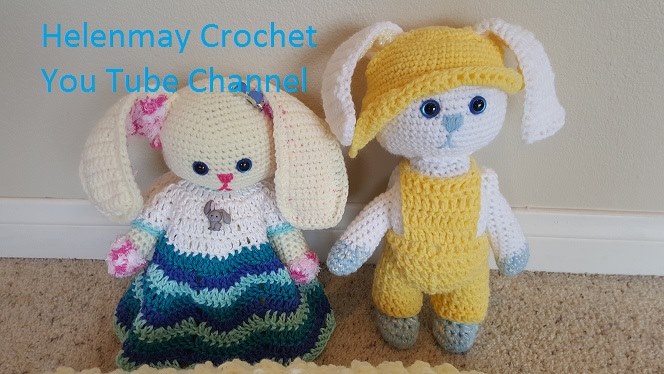
I have compiled pictures (above) that include all of my Crochet Rabbit designs up to 3 Mar 2018. I have everything from extra small, small, and large crochet bunny rabbits. Some of them have malleable ears! I show how I made them in some of my video tutorials. If you would like to go to my Helenmay Crochet YouTube Channel now, to browse through my step-by-step YouTube video tutorials, click here.
My personal favorite is my Crochet Large Adorable Bunny Rabbit.
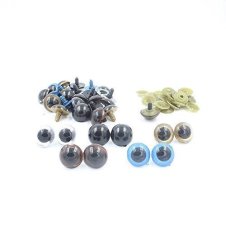
If you like the black safety eyes that I used, click the affiliate link here to purchase your own.
If you want to try some different colored safety eyes, click the link here, or the picture:
You can also go to my “Ordering Safety Eyes and Noses” button on my homepage, and you will see a variety of different fun safety eyes that you can use.
My Crochet Fiesta Ripple Dress fits my crochet large adorable bunny rabbit, and you can have a lot of fun making the dress with different colors!
For my Crochet Large Adorable Bunny Rabbit Pant Overalls:
Here is my quick, easy, beginner amigurumi bunny rabbit:
If you like the malleable ears, I show you how I made them in this video tutorial:
The craft wire that I used in the video tutorial works great, but here is the craft wire that I like to use now. Click here to go see it. Be aware that the wire gauge gets larger/heavier as the gauge gets smaller. If you prefer a smaller/lighter gauge wire, here is the direct link: smaller gauge craft wire
Here is a special saving on a bulk buy, 3 pack on a different smaller gauge size: craft wire bulk buy 3 pack
I am currently testing the larger/heavier craft wire on 2 different crochet rabbits for the written pattern that will go here.
Here is my Quick, Easy, Beginner Cute Little Bunny Rabbit with its little crochet carrot:
Copying and distribution prohibited. For personal use only.
PDF version is also available for free for “Subscribers” to my blog. Go to the “Contact” button on my HOME page and let me know that you would like my Crochet Cute Little Bunny Rabbit PDF Written Pattern. It contains pictures as well.
ABBREVIATIONS:
sc= single crochet inc = increase
ch= chain stitch rnd(s)= round (s)
FO= finish off or fasten off Sl st= slip stitch
mm= millimeter (s) hdc= half double crochet
Sc2 tog= single crochet 2 stitches together DC= double crochet
(Sc2tog: Insert crochet hook into first stitch, yarn over and bring up loop,
insert hook into second stitch, yarn over and bring up loop, 3 loops on
your hook, yarn over and bring yarn through all 3 loops.)
(Rabbits are approximately 5 inches tall)
GENERAL MATERIALS LIST: You can mix and match yarn colors for different looks
– Super soft 4-ply premium worsted weight yarn. I used Lions Brand Pound of
Love yarn: one color for the inner ear, one for the main color of the bunny, and
one for the nose and mouth.
– 100% cotton yarn for the carrot. I used “I love this cotton: super soft, super
savings.” I used an orange color and green color.
– 2 animal safety eyes (12mm or 9mm). I like them both, but prefer the 12mm.
– Size “F” crochet hook (4.00mm)
– 1 tapestry needle
– 1 pair of scissors
Head:
– Using the magic circle technique, make 6 sc into the magic circle.
– 2 sc into every stitch around (total of 12) ***Alternative to the magic circle:
-ch2
-work all of your stitches in the second ch from the hook. Do not count the 1st ch
you skipped as a stitch. -Increase rounds:
-*1sc in 1 stitch and 2sc in second stitch. Repeat from * (18 total stitches).
-*1sc in 2 stitches and 2sc in third stitch. Repeat from * (24 total stitches).
-Make 1sc in every stitch for 2 rounds (24 total stitches each round)
-*1sc in 3 stitches and 2sc in fourth stitch. Repeat from * (30 total stitches).
-Make 1sc in every stitch for 2 rounds (30 total stitches each round)
-*1sc in 2 stitches and 2sc in third stitch. Repeat from * (40 total stitches).
-Make 1sc in every stitch for 2 rounds (40 total stitches each round) -Decrease rounds:
-*1sc into 2 stitches then Sc2tog. Repeat from * (30 total stitches).
-*1sc into 3 stitches then Sc2tog. Repeat from * (24 total stitches).
-*1sc into 2 stitches then Sc2tog. Repeat from * (18 total stitches).
Place the eyes and sew on the nose:
-Go to the opposite side of the head (where you want to make your rabbit
face), count down 8 rows from the magic circle on top of the rabbit head, place
your eyes with approximately 4-5 stitches between each eye. Once you are sure
that you have the eyes where you want them, place the safety backing on.
-Use your tapestry needle to sew on the nose and mouth. Center the top
of the nose between the eyes, go two rows down to form a triangle. Fill in the
triangle with your yarn. Go one row down from the bottom point of the triangle to
start the mouth. Go one stitch over and one row down for each side of the mouth.
-Stuff the head with craft, or pillow, stuffing. -Decrease Rounds:
-* 1sc into one stitch and then Sc2tog. Repeat from *. (11 total stitches).
– Sc2tog and slip stitch the head closed. FO and bury your loose yarn end. Body:
– Using the magic circle technique, make 6 sc into the magic circle.
– 2 sc into every stitch around (total of 12). Increase rounds:
-*1sc in 1 stitch and 2sc in second stitch. Repeat from * (18 total stitches).
-*1sc in 2 stitches and 2sc in third stitch. Repeat from * (24 total stitches).
-Make 1sc in every stitch for 6 rounds (24 total stitches each round).
-Stuff the body as you close. Decrease rounds:
-*1sc into 2 stitches then Sc2tog. Repeat from * (18 total stitches).
-*1sc into one stitch and then Sc2tog. Repeat from *.
– Sc2tog and slip stitch the head closed. FO and bury your loose yarn end.
Sew the head to the body with your tapestry needle
Ears: 2 inner ear color and 2 outer ear color. Both inner ears and outer ears are made the same way: Make 2 inner ears one color and 2 outer ears the same color as your bunny rabbit.
-Make a ch4.
-1sc in 2nd chain from hook. 1 sc in each of the next 2 stitches
(4 total stitches).
-ch1, turn, 1sc in same stitch. 1sc in each of the next 2 stitches. 2sc in the
last stitch (6 total stitches).
-ch1, turn, 1sc in next 4 stitches. 2sc in the last stitch (7 total stitches).
-*ch1, turn, 1sc in next 6 stitches. Repeat from * 5 times (7 total stitches).
-Turn, 1sc in next 6 stitches (6 total stitches).
-Turn, 1sc in next 5 stitches (5 total stitches).
-Turn, 1sc in next 4 stitches (4 total stitches).
-Turn, 1sc in next 3 stitches (3 total stitches).
-Turn, 1sc in next 2 stitches (2 total stitches).
-Turn, 1sc in next stitch. FO.
-Place the inner ear on top of the outer ear. With the inner ear facing up, make
1sc in every stitch along the side of the inner and outer ear.
-Make 3 sc in the same stitch at the top point of the ear.
-1sc in every stitch on the other side of the ear, across the bottom of the ear, and
back to the beginning stitch ( tuck all of the loose yarn ends into the inside of the
ear before reaching the beginning stitch).
-slip stitch into the beginning stitch. FO. Leave a long loose yarn end for sewing
the ear onto the rabbit.
Sew the rabbit ears onto the rabbit with your tapestry needle.
Arms: Make 2.
– Using the magic circle technique, make 6 sc into the magic circle.
– 2 sc into every stitch around (total of 12)
-Make 1sc in every stitch for 2 rounds (12 total stitches each round).
Decrease rounds:
-*1sc into 3 stitches then Sc2tog. Repeat from * Make 1sc in the 2
remaining stitches (10 total stitches).
-*1sc into 2 stitches then Sc2tog. Repeat from * Make 1sc in the 2
remaining stitches (8 total stitches).
-*1sc into 1 stitch then Sc2tog. Repeat from * Make 1sc in the 2 remaining
stitches (6 total stitches).
– Slip stitch the arm closed. FO and make your loose yarn end long
enough for sewing the arm onto the rabbit.
Feet and tail: Make 2 for the feet and 1 for the tail (you can change colors for the tail if you want).
– Using the magic circle technique, make 6 sc into the magic circle.
– 2 sc into every stitch around (total of 12)
-Make 1sc in every stitch for 3 rounds (12 total stitches each round).
– *Sc2tog. Repeat from * for one round (6 total stitches) and then slip stitch
closed. FO and make your loose yarn end long enough for sewing the feet and
tail onto your rabbit.
Sew on the hands and carrot before sewing on the feet.
-The feet will be flattened into a circle before sewing them on the rabbit.
-The tail will be kept open before sewing it onto your rabbit.
Carrot:
– Using the magic circle technique, make 6 sc into the magic circle.
– 2 sc into every stitch around (total of 12)
-Make 1sc in every stitch for 2 rounds (12 total stitches each round).
-Stuff the carrot as you close it.
Decrease rounds:
-*1sc into 3 stitches then Sc2tog. Repeat from * Make 1sc in the 2
remaining stitches (10 total stitches).
-*1sc into 2 stitches then Sc2tog. Repeat from * Make 1sc in the 2
remaining stitches (8 total stitches).
-*1sc into 1 stitch then Sc2tog. Repeat from * Make 1sc in the 2 remaining
stitches (6 total stitches).
– Slip stitch the carrot closed. FO and bury your loose yarn end.
Carrot stems: Make 2.
-Make a ch4.
-1sc in second chain from the hook.
-1 hdc in next stitch.
-1sc in next stitch. Slip stitch in the same stitch. FO and make the
loose yarn end long enough for sewing the carrot stem on the carrot
(tie a knot with the initial short loose yarn end and the long yarn end
that you finished off with).
-Sew the carrot stems onto the carrot and bury your loose yarn ends.
-Sew the rabbit arms on in a position where your rabbit can hold the
carrot and then sew the carrot in place.
-Sew the rabbit feet on. Flatten the feet like a disc as you sew them
on.
-Sew the rabbit tail on and make sure that the tail is not flattened as
you sew (sew it along the base only).
Sew on the hands and carrot before sewing on the feet.
Flatten the feet into a disc shape before sewing them on.
Sew the tail on, making sure to sew at the base of the tail only.
Copyright 2016 by Helen Brady. All rights reserved. This pattern may not be used for purposes of mass production. The owner of the pattern may, however, sell the items he or she makes from it.
To see more designs by Helen Brady, you can also visit: Helenmay Crochet You Tube Channel Ravelry
Be sure to go to my Helenmay Crochet You Tube Channel and check out my different Crochet Baskets to go with your Crochet Bunny! I hope that you will share a picture of your finished crochet work with me on Facebook! I would love to see them! I plan on featuring people’s crochet work on my Home page in the future, depending on how many pictures I receive. I have already received some crochet pictures for March, so look for my featured, crochet work by someone else, at the end of March 2018.
ANY DONATIONS TO MY SITE ARE GREATLY APPRECIATED!! THANK YOU VERY MUCH!
IF YOU DON’T SPEAK ENGLISH, I HAVE GOOGLE TRANSLATE AVAILABLE ON MY BLOG. SCROLL TO THE VERY BOTTOM OF THIS PAGE TO FIND THE FEATURE, OR YOU CAN GO TO MY HOME PAGE AND SCROLL TO THE BOTTOM TO FIND IT.
Information about “The Crochet Waves of Love Baby Blanket” can be found after the written pattern for my “Crochet Waves of Love Baby Booties.”
Copyright 2018 by Helen Brady. All rights reserved. This pattern may not be used for purposes of mass production. The owner of the pattern may, however, sell the items he or she makes from it.
This slideshow requires JavaScript.
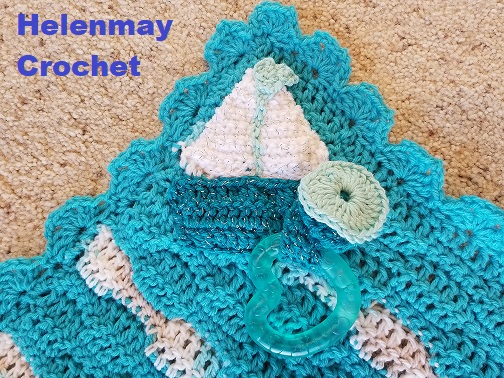
Would you like a crochet anchor applique on your Crochet Waves of Love Set? You can find the crochet anchor applique at the end of my Crochet Waves of Love Baby Booties video tutorial.
The following are direct links for some of the other crochet items in the Crochet Waves of Love set:
Free Crochet Waves of Love Baby Hat YouTube Video Tutorial:
My Crochet Waves of Love Baby Hat paid written pattern is available for purchase on:
The Crochet Waves of Love Baby Booties video tutorial:
The Crochet Written pattern, for my CrochetWaves of Love Baby Booties: It is because of the donors to my blog, that I am going to provide the Crochet Waves of Love Baby Booties free written pattern here on my blog as promised for a limited time:
page 1
ABBREVIATIONS:
Sc= single crochet inc= increase
Ch= chain stitch rnd(s)= round (s)
FO= finish off or fasten off Sl st= slip stitch
Right side= the side that will be showing mm= millimeter (s)
Wrong side= the side that will not be showing. cm= centimeter (s)
Hdc2tog= Yarn Over (YO). Insert your crochet hook into the next stitch. Pull the yarn through the stitch on your crochet hook. You should now have three loops on your crochet hook. YO Insert your crochet hook into the next stitch. Pull the yarn through the stitch on your crochet hook. You should now have five loops on your crochet hook. YO, pull the yarn through all five loops on your crochet hook.
Treble Crochet (tr)= YO twice. Insert your crochet hook into the next st. Pull the yarn through the st on your crochet hook. You should now have 4 loops on your crochet hook. YO, and pull the yarn through 2 of the loops on your crochet hook. You should now have 3 loops on your crochet hook. YO, and pull the yarn through 2 loops on your crochet hook. You should now have 2 loops remaining on your crochet hook. YO, and pull the yarn through the 2 remaining loops on your crochet hook.
page 2
GENERAL MATERIALS LIST: You can mix and match yarn colors for different looks. Just be aware that different yarn choices can change the look and size of your crochet baby bootie when finished. Also, changing your crochet hook size, will also affect the size of your crochet baby bootie and/or anchor.
-Crochet Hook Size 3.75mm.
-Tapestry Needle
-Scissors.
-Stitch markers (If you don’t have stitch markers, you can use your extra loose yarn ends. I used my excess loose yarn ends on video tutorial
**My yarn recommendations (On You Tube video tutorial, I used some different yarn choices. So, you can see the broad range of yarn choices that you could have when making your own unique crochet baby booties.):
-1 skein Big Twist Rainbow Classic 100% Acrylic Yarn color Serene Blue. You will have plenty of yarn left over.
-1 skein Big Twist Rainbow Classic 100% Acrylic Yarn color Royal Blue. You will have plenty of yarn left over.
If you liked the yarn that I used for my crochet anchor, click here, to the affiliated link.
Here is the yarn that I used for the Crochet Anchor Chain, click here, to the affiliated link.
page 3
On YouTube video tutorial, I show how to crochet 2 different sizes: up to 12 months and 3-6 months. I will also show both sizes on this written pattern. I will start with the smaller crochet baby bootie, and show the differences with the larger bootie.
SMALLER SOLE: I started with Royal Blue Colored Yarn.
-Ch14. Starting ch. (***Larger Sole was a ch20 Starting chain)
-Make 3dc into the 4th ch from the hook, then 1dc into the next 2 stitches, 1hdc into the next st., 1dc into the next 3 stitches, 1 tr into the next 3 stitches, (***Larger sole is 1tr in next 6 st), 9tr into the last st. Working in rounds, turn your work to make crochet stitches on the opposite side of your starting chain. Make 1tr into the next 3 stitches (***Larger sole is 1tr in next 6 st), then 1dc into the next 3 stitches, 1hdc into the next st, and 1 dc into the next 2 st, then 3dc into the last st, which is the same st your first 3dc were made. Slst into the top st of the first ch3 that you made. (34 total) (***Larger sole 46 total)
***This is the time that you can measure the sole of your baby shoe, and determine if it is the correct size, before you continue on. Use your free downloadable PDF baby bootie sizing chart to compare it to. When you look at my Larger Sole differences, you will see where I made changes in the size of my initial ch, and in the crochet stitches to alter the size. That way you will see how you can alter the stitches in the sole to get different sole sizes for your baby bootie.
-Using your stitch markers: Place a stitch marker in the following stitches: 5,6,13,14,17,18,29,30, and 33. (***Larger sole stitch markers: 7,9,22,25,26,40,42,47)
-Place your yarn marker before starting your next round (To help keep track of the rounds and stitch count). Make 1sc into the next st and every st around, except for the stitches that contain a stitch marker. Place 2sc into the same st that contains a st marker. Slst into the top st of the first ch3 that you made. Double check your stitch count before going on further. (43 total) (***Larger sole 54 total)
-Move your yarn marker up. Make 1sc into every st around for 3 rounds. (43 total) (***Larger sole is same st count as previous round, unless otherwise specified).
Decrease rounds– Your decrease stitches should be centered around the front of the bootie.
-Make 1sc into 9 stitches, then make 10 hdc2tog stitches. Make 1sc into each of the remaining stitches. (33 total) (***Larger sole: Make 1sc in 17 st, then 12 hdc2tog total st count 42)
-Make 1sc into 9 stitches, then make 6 hdc2tog stitches. Make 1sc into each of the remaining stitches. (27 total) (***Larger sole: Make 1sc in 13st then 8 hdc2tog total st count 34)
-Make 1sc into 9 stitches, then make 3 hdc2tog stitches. Make 1sc into each of the remaining stitches. (24 total) (***Larger sole: Make 1sc into 12 st then 5 hdc2tog total st count 29)
page 5
Join your new color, and cut your previous colored yarn. Bury your loose yarn ends as you crochet. I used Serene Blue.
For the next round, we are going to start our first crochet wave stitch design with our new color. Wave Stitch Rounds:
-Make 2sc into the next st, then make 1sc into the next 3 st, then make 1dc into the next 5 st. *Make 1sc into the next 5 stitches, then make 1dc into the next 5 stitches. Repeat from * for one round. (25 total) (***Large Sole 30 total) **You should have ended this round with 1sc in 5 stitches. (***Large Sole will end the round with 1dc in 5 stitches). The wave st requires a multiple of 5 or 10. The small sole has a multiple of 5, which is “25” and the large sole has a multiple of 10, which is “30.” You have just completed the bottom portion of the wave st.
-*Make 1sc into the next 5 stitches (Each sc st should be in the previous rows sc st), then make 1dc into the next 5 stitches (Each dc st should be in the previous rows dc st). Slst into the next st. (25 total) **You have just completed the top portion of the wave st. You should have completed 2.5 waves in the round. (***Larger sole has 3 total waves in the round.) Join your new color, and cut your previous colored yarn. Bury your loose yarn ends as you crochet. I used Royal Blue. For the next round, we are going to start our second crochet wave stitch design with our new color.
Wave Stitch Rounds: We are going to alternate our wave pattern. Since we started with sc for our last wave pattern, we will start with a dc for our second wave pattern.
-Ch3 (This ch3 should be directly over the previous rows first sc), make 1dc into the next 4 st. *Make 1sc into the next 5 st, and then make 1dc into the next 5 st. Repeat from * Slst into the top st of the first ch3 that you made (25 total) **Each dc will line up with the previous rows sc, and each sc will line up with the previous rows sc. You have just completed the bottom portion of the wave st.
-Ch3, make 1dc into the next 4st. *Make 1sc into the next 5 st, and then make 1dc into the next 5st. Repeat from* Slst into the top st of the first ch3 that you made. (25 total) **Each dc will line up with the previous rows dc, and each sc will line up with the previous rows sc. You have just completed the top portion of the wave st. You should have completed 2.5 waves in the round. (***Large sole 3 waves in the round).
Join your new color, and cut your previous colored yarn. Bury your loose yarn ends as you crochet. I used Serene Blue. -Make 1sc in every st around. FO. (25 total)
page 6
ANCHOR: Peacock colored yarn. The Anchor Chain yarn will also work as the main color for the anchor. Both yarns work with a 3.5mm crochet hook. See the picture at the end of this pattern.
-Ch 16
-Make 1hdc into the 3rd ch from the hook, and make 1hdc in every st back across. FO. Bring enough yarn through to help sew the bottom of the anchor in place later. (15 total) -From the side that you FO, and the right side facing you, count inwards 10 stitches, and join your same colored yarn. Starting with next st over, Sc2tog twice. ***You are in the center of the bottom of the anchor.
-*Ch1, turn your work, make 1sc into the next st. Repeat from * 5 times. (2 total) ***This is the center of the anchor.
-Make a chain of 3, turn your work, then sc into the 2nd ch from the hook, make 1sc into the next st, then that will bring you back to the center of the anchor (small handle, right top part of anchor is complete). Make 1sc into the next 2 st. (Center of the anchor). Make a chain of 3, turn your work, then sc into the 2nd ch from the hook, make 1sc into the next st, then that will bring you back to the center of the anchor (small handle, left top part of anchor is complete). Slst into the next st. (Center of the anchor).
-*Ch1, turn your work, make 1sc into the next st over. Repeat from * 1 more time. (2 total) ***Top center of anchor, above small handles.
-Make a chain of 8, turn your work, Slst into the next st. ***You formed the loop at the top of the anchor.
-Turn your work, and make 8 sc into the center of the loop at the top of the anchor. Slst into the next st. FO. Bring enough yarn through to sew the anchor appliqué in place. ***Thickened the loop at the top of the anchor.
ANCHOR CHAIN: I used Baby Grey Marl colored yarn
-Ch20. FO. Bring enough yarn through to sew the anchor chain on the anchor.
-Tie the smaller loose yarn end around the loop of the anchor. With the right side of the anchor facing you, the knot will be to the right.
-Bring the anchor chain from the back side of the anchor loop, to the front side of the anchor loop.
-Bring the anchor chain across the front of the anchor, to the right, go behind the top right small handle of the anchor.
-Bring the anchor chain from the back side to the front side, by going under the top left small handle of the anchor.
-Bring the anchor chain across the front of the anchor, and down to the bottom of the anchor, bringing the anchor chain towards the back side of the anchor. Sew it in place on the bottom of the anchor.
Page 7
Your anchor appliqué is now ready to be sewn on your Crochet Wave of Love Baby Booties. Line up the anchor on the front of your baby bootie. I started sewing the loop of the anchor first, sewed down the center of the anchor, lined up the bottom of the anchor (make sure it isn’t crooked), sewed the bottom of the anchor in place, and then sewed the anchor chain in place. There is a separate video tutorial for the Crochet Waves of Love Baby Hat, Security Blanket, and Baby Blanket.
If you liked the yarn that I used for my crochet anchor, click here, to the affiliated link.
Here is the yarn that I used for the Crochet Anchor Chain, click here, to the affiliated link.
The yarns look good in reverse too, as shown in the pictures below. I used the same size crochet hook for both yarn choices for the anchor.
The Crochet Waves of Love Security Blanket, and matching Baby Blanket, is on YouTube video tutorial only. I DO NOT have the Crochet Written Pattern available as of 24Sept18
Crochet Waves of Love Baby Blanket and matching Security Blanket:
Affiliated links are below. If you don’t know what affiliate links are, please read my “Disclosures/Disclaimers” and “Privacy Policy.”
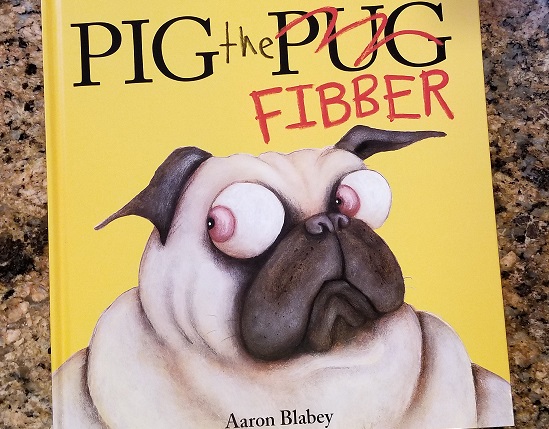
When I first saw the book above, I had to have it for my grandchildren! I love books that teach moral lessons to children. If you would like to purchase the book, click the picture above, or here, to go directly to the affiliate link.
One of my most popular crochet written dog patterns is my adorable pug dog. I have Over 30 crochet dogs!!!!! to choose from!!!
This slideshow requires JavaScript.
If you would like to go to my Ravelry Link for the paid crochet PDF written pattern for the crochet pug dog only, click here.
For one of my Crochet Pug Dog, I used a Star Wars Pet Outfit that I purchased, and it will fit a real medium-sized dog. Another cute pet outfit is a tuxedo.
You won’t believe the unbelievable deal that Amazon has for this gorgeous fair isle knitted pet outfit! To check it out, click on the affiliated link here.
This knitted Christmas Reindeer Fair Isle is also adorable! Click on the affiliate link here.
Wait until you see this super affordable and cute shark pet outfit! Click on the affiliate link here.
Last, but not least, you have to see the tuxedo pet outfit. Click on the affiliate link here.
Please share your finished crochet work with me! I plan on sharing your crochet work in my “People Who Have Shared Their Crochet Work With Me” Blog post. I will choose one picture to feature on my Home Page. I am going to start at the beginning of April 2018. You can share any of the crochet work that you have made using my YouTube Video Tutorials.
Please Subscribe to my Blog. You will find where to subscribe at the bottom of the page. You will receive emails for any new blog posts.
Happy Crocheting!!
Here is my free step-by-step You Tube video tutorial:
I have an affiliate link below. If you are unsure of what an affiliate link is, please read my “Disclosures/Disclaimers” and “Privacy Policy,” at the top of my HOME page.
I absolutely love it when people share their crochet work with me, and I read all of your comments!! I try my best to respond within a week or less. If you don’t hear back from me, the quickest way to reach me is through Facebook. I wanted to share some of the pictures that I have in my files, and I will continue to add more over the years. If I am missing any, please send me a picture via Facebook, and I will add it. Thank you so much for sharing!!
I will be sharing crochet pictures a little differently for the year 2019. I will save all of the crochet pictures that people send me for the year 2019. The crochet pictures must be from one of my free YouTube video tutorials. At the end of the year, I will pick one person that shared the most completed crochet pictures for the year 2019. You can be from anywhere in the world! I will send you a free surprise of my choice on 31Dec2019. I am not responsible for lost or damaged mail. I will send you the tracking# after I mail your package. The surprise may be a gift card via email depending on where the prize winner is from. If you are younger than 18 years of age, I need parental/guardian consent in order for you to receive the free surprise of my choice. NO PURCHASE NECESSARY. VOID WHERE PROHIBITED.
I will change the featured picture at the top, and on my HOME page, periodically. It was very difficult picking only one from all of the beautiful crochet work! The picture that I chose to feature the end of the year 2018 and the beginning of 2019 was by φωτεινη Σιωσιου. I chose the picture for the following reasons: The person is from Greece (How awesome is that? The internet is amazing), they made an heirloom Crochet Christmas scene using several of my crochet designs, and last but not least how adorable do they look?!?!
Here are the rest of the pictures of crochet work shared with me from 9Nov18 until 1Jan2019.
This slideshow requires JavaScript.
Previous pictures and featured crochet photos:
Everyone had beautiful crochet work submitted, and it was very difficult choosing only one to feature!!! I loved them all, so I posted all of the pictures shared with me from the time frame: 14Sep18 until 8Nov18.
This slideshow requires JavaScript.
The following pictures were featured from June to Sept18. My Large Crochet Mustang Horse is not a quick and easy crochet project to complete and Jackie Jean Murphy and Julie Garcia did an incredible crochet job! If you would like to make my large crochet Mustang Horse, here is the direct link: Crochet Large Mustang Horse
The following pictures are from June 2018 until 14Sept18:
This slideshow requires JavaScript.
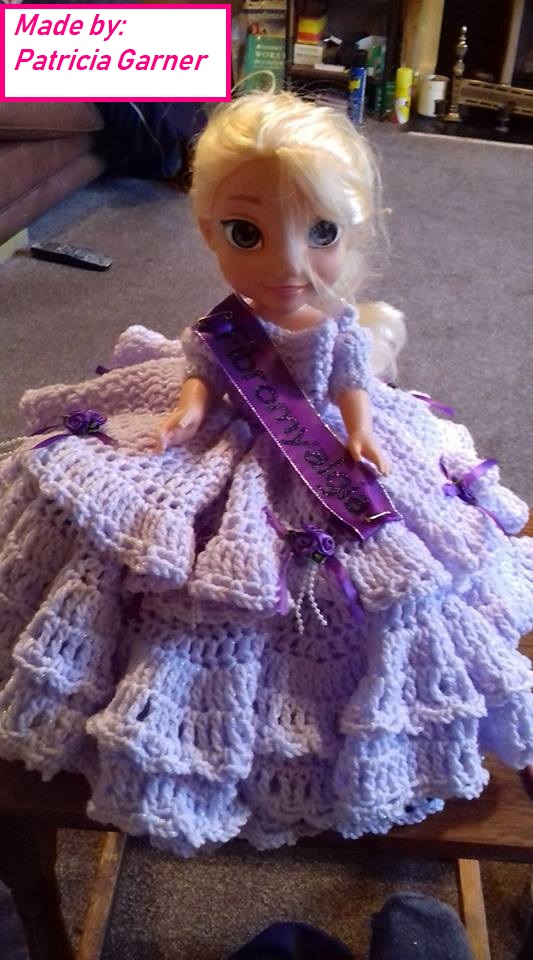
This picture was featured until 14Sep18 by Patricia Garner. She has helped multiple charities over the years! Poppy Appeal, Help the Heroes, Cystic Fibrosis, Cancer Awareness, and now Fibromyalgia!!!! You are amazing Patricia!!! I love your gorgeous crochet bed dolls!!
The following pictures are from APRIL to JUNE 2018
This slideshow requires JavaScript.
The following pictures are from MARCH 2018
This slideshow requires JavaScript.
The pictures below are from the beginning of the year 2018
This slideshow requires JavaScript.
The pictures below are from previous years:
This slideshow requires JavaScript.
I get asked a lot about what doll that I used for my crochet bed doll. If you want to check out the doll that I used here is the affiliated link: